Spring Boot - Concepts
Maven Dependency
For Maven configuration, Spring Boot Starters dependencies in our pom.xml file as shown below.
<parent>
   <groupId>org.springframework.boot</groupId>
   <artifactId>spring-boot-starter-parent</artifactId>
   <version>1.5.8.RELEASE</version>
</parent>We can import the Spring Boot Starters dependencies directly into build.gradle file. Sample given below −
buildscript {
   ext {
      springBootVersion = '1.5.8.RELEASE'
   }
   repositories {
      mavenCentral()
   }
   dependencies {
      classpath("org.springframework.boot:spring-boot-gradle-plugin:${springBootVersion}")
   }
}package com.quicklearn.myproject;
import org.springframework.boot.SpringApplication;
import org.springframework.boot.autoconfigure.SpringBootApplication;
@SpringBootApplication
public class Application {
public static void main(String[] args) {SpringApplication.run(Application.class, args);}
}In Spring Boot, we can use Spring Framework to define our beans and their dependency injection. The @ComponentScan annotation is used to find beans and the corresponding injected with @Autowired annotation.
If you followed the Spring Boot typical layout, no need to specify any arguments for @ComponentScan annotation. All component class files are automatically registered with Spring Beans.
The following example provides an idea about Auto wiring the Rest Template object and creating a Bean for the same −
@Bean
public RestTemplate getRestTemplate() {
   return new RestTemplate();
}
The following code shows the code for auto wired Rest Template object and Bean creation object in main Spring Boot Application class file −
package com.tutorialspoint.demo;

import org.springframework.beans.factory.annotation.Autowired;
import org.springframework.boot.SpringApplication;
import org.springframework.boot.autoconfigure.SpringBootApplication;
import org.springframework.context.annotation.Bean;
import org.springframework.web.client.RestTemplate;

@SpringBootApplication
public class DemoApplication {
@Autowired
   RestTemplate restTemplate;

   public static void main(String[] args) {
      SpringApplication.run(DemoApplication.class, args);
   }
   @Bean
   public RestTemplate getRestTemplate() {
      return new RestTemplate();
   }
}
Use of @Value Annotation
The @Value annotation is used to read the environment or application property value in Java code. The syntax to read the property value is shown below −
@Value("${property_key_name}")
Look at the following example that shows the syntax to read the spring.application.name property value in Java variable by using @Value annotation.
@Value("${spring.application.name}")
Observe the code given below for a better understanding −
import org.springframework.beans.factory.annotation.Value;
import org.springframework.boot.SpringApplication;
import org.springframework.boot.autoconfigure.SpringBootApplication;
import org.springframework.web.bind.annotation.RequestMapping;
import org.springframework.web.bind.annotation.RestController;

@SpringBootApplication
@RestController
public class DemoApplication {
   @Value("${spring.application.name}")
   private String name;
   public static void main(String[] args) {
      SpringApplication.run(DemoApplication.class, args);
   }
   @RequestMapping(value = "/")
   public String name() {
      return name;
   }
}
Note − If the property is not found while running the application, Spring Boot throws the Illegal Argument exception as Could not resolve placeholder 'spring.application.name' in value "${spring.application.name}".
To resolve the placeholder issue, we can set the default value for the property using below syntax−
@Value("${property_key_name:default_value}")

@Value("${spring.application.name:myservice}")
Spring Boot Active Profile
Spring Boot supports different properties based on the Spring active profile. For example, we can keep two separate files for development and production to run the Spring Boot application.
Spring active profile in application.properties
Let us understand how to have Spring active profile in application.properties. By default, application. properties will be used to run the Spring Boot application. If you want to use profile based properties, we can keep separate properties file for each profile as shown below −
application.properties
server.port = 8080
spring.application.name = myservice
application-dev.properties
server.port = 9090
spring.application.name = myservice
application-prod.properties
server.port = 4431
spring.application.name = myservice
While running the JAR file, we need to specify the spring active profile based on each properties file. By default, Spring Boot application uses the application.properties file. The command to set the spring active profile is shown below −

RESTful web service with annotations −
Rest Controller
The @RestController annotation is used to define the RESTful web services. It serves JSON, XML and custom response. Its syntax is shown below −
@RestController
public class UserServiceController {
}
Request Mapping
The @RequestMapping annotation is used to define the Request URI to access the REST Endpoints. We can define Request method to consume and produce object. The default request method is GET.
@RequestMapping(value = "/users")
public ResponseEntity<Object> getUser() { }
Request Body
The @RequestBody annotation is used to define the request body content type.
public ResponseEntity<Object> createUser(@RequestBody User user) {
}
Path Variable
The @PathVariable annotation is used to define the custom or dynamic request URI. The Path variable in request URI is defined as curly braces {} as shown below −
public ResponseEntity<Object> updateUser(@PathVariable("id") String id) {
}
Request Parameter
The @RequestParam annotation is used to read the request parameters from the Request URL. By default, it is a required parameter. We can also set default value for request parameters as shown here −
public ResponseEntity<Object> getUser(
   @RequestParam(value = "name", required = false, defaultValue = "bhavin") String name) {
}The @ExceptionHandler is an annotation used to handle the specific exceptions and sending the custom responses to the client.
Controller Advice
The @ControllerAdvice is an annotation, to handle the exceptions globally.
Interceptor in Spring Boot to perform operations under the following situations −
Before sending the request to the controller
Before sending the response to the client
For example, you can use an interceptor to add the request header before sending the request to the controller and add the response header before sending the response to the client.
To work with interceptor, you need to create @Component class that supports it and it should implement the HandlerInterceptor interface.
The following are the three methods you should know about while working on Interceptors −
preHandle() method − This is used to perform operations before sending the request to the controller. This method should return true to return the response to the client.
postHandle() method − This is used to perform operations before sending the response to the client.
afterCompletion() method − This is used to perform operations after completing the request and response.
File Upload
For uploading a file, you can use MultipartFile as a Request Parameter and this API should consume Multi-Part form data value. Observe the code given below −
@RequestMapping(value = "/upload", method = RequestMethod.POST, consumes = MediaType.MULTIPART_FORM_DATA_VALUE)

public String fileUpload(@RequestParam("file") MultipartFile file) {
   return null;
}
File Download
For file download, you should use InputStreamResource for downloading a File. We need to set the HttpHeader Content-Disposition in Response and need to specify the response Media Type of the application.
Service Components
This are the class file which contains @Service annotation. These class files are used to write business logic in a different layer, separated from @RestController class file. The logic for creating a service component class file is shown here −
public interface UserService {
}
The class that implements the Interface with @Service annotation is as shown −
@Service
public class UserServiceImpl implements UserService {
}
Cross-Origin Resource Sharing (CORS)
It is a security concept that allows restricting the resources implemented in web browsers. It prevents the JavaScript code producing or consuming the requests against different origin.
For example, your web application is running on 8080 port and by using JavaScript you are trying to consuming RESTful web services from 9090 port. Under such situations, you will face the Cross-Origin Resource Sharing security issue on your web browsers.
Two requirements are needed to handle this issue −
RESTful web services should support the Cross-Origin Resource Sharing.
RESTful web service application should allow accessing the API(s) from the 8080 port.
In this chapter, we are going to learn in detail about How to Enable Cross-Origin Requests for a RESTful Web Service application.
Enable CORS in Controller Method
We need to set the origins for RESTful web service by using @CrossOrigin annotation for the controller method. This @CrossOrigin annotation supports specific REST API, and not for the entire application.
@RequestMapping(value = "/users")
@CrossOrigin(origins = "http://localhost:8080")

public ResponseEntity<Object> getUsers() {
   return null;
}
Global CORS Configuration
We need to define the shown @Bean configuration to set the CORS configuration support globally to your Spring Boot application.
@Bean
public WebMvcConfigurer corsConfigurer() {
   return new WebMvcConfigurerAdapter() {
      @Override
      public void addCorsMappings(CorsRegistry registry) {
         registry.addMapping("/users").allowedOrigins("http://localhost:9000");
      }
   };
}
To code to set the CORS configuration globally in main Spring Boot application is given below.
package com.quicklearn.myproject;

import org.springframework.boot.SpringApplication;
import org.springframework.boot.autoconfigure.SpringBootApplication;
import org.springframework.context.annotation.Bean;
import org.springframework.web.servlet.config.annotation.CorsRegistry;
import org.springframework.web.servlet.config.annotation.WebMvcConfigurer;
import org.springframework.web.servlet.config.annotation.WebMvcConfigurerAdapter;

@SpringBootApplication
public class MyApplication {
   public static void main(String[] args) {
      SpringApplication.run(MyApplication.class, args);
   }
   @Bean
   public WebMvcConfigurer corsConfigurer() {
      return new WebMvcConfigurerAdapter() {
         @Override
         public void addCorsMappings(CorsRegistry registry) {
            registry.addMapping("/users").allowedOrigins("http://localhost:8080");
         }
      };
   }
}
Now, you can create a Spring Boot web application that runs on 8080 port and your RESTful web service application that can run on the 9090 port.
Scheduling is a process of executing the tasks for the specific time period. Spring Boot provides a good support to write a scheduler on the Spring applications.
Java Cron Expression
Java Cron expressions are used to configure the instances of CronTrigger, a subclass of org.quartz.Trigger. For more information about Java cron expression you can refer to this link −
https://docs.oracle.com/cd/E12058_01/doc/doc.1014/e12030/cron_expressions.htm
The @EnableScheduling annotation is used to enable the scheduler for your application. This annotation should be added into the main Spring Boot application class file.
Fixed Rate
Fixed Rate scheduler is used to execute the tasks at the specific time. It does not wait for the completion of previous task. The values should be in milliseconds.
Fixed Delay
Fixed Delay scheduler is used to execute the tasks at a specific time. It should wait for the previous task completion. The values should be in milliseconds.
HTTPS Certificate
By default, Spring Boot application uses HTTP 8080 port when the application starts up.

You need to follow the steps given below to configure the HTTPS and the port 443 in Spring Boot application −
Obtain the SSL certificate – Create a self-signed certificate or get one from a Certificate Authority
Enable HTTPS and 443 port
Self-Signed Certificate
To create a self-signed certificate, Java Run Time environment comes bundled with certificate management utility key tool. This utility tool is used to create a Self-Signed certificate. It is shown in the code given here −
keytool -genkey -alias tomcat -storetype PKCS12 -keyalg RSA -keysize 2048 -keystore keystore.p12 -validity 3650
Enter keystore password:
   Re-enter new password:
   What is your first and last name?
   [Unknown]:
   What is the name of your organizational unit?
   [Unknown]:
   What is the name of your organization?
   [Unknown]:
   What is the name of your City or Locality?
   [Unknown]:
   What is the name of your State or Province?
   [Unknown]:
   What is the two-letter country code for this unit?
   [Unknown]:
   Is CN = Unknown, OU=Unknown, O = Unknown, L = Unknown, ST = Unknown, C = Unknown correct?
   [no]: yes
This code will generate a PKCS12 keystore file named as keystore.p12 and the certificate alias name is tomcat.
Configure HTTPS
We need to provide the server port as 443, key-store file path, key-store-password, key-store-type and key alias name into the application.properties file. Observe the code given here −
server.port: 443
server.ssl.key-store: keystore.p12
server.ssl.key-store-password: springboot
server.ssl.keyStoreType: PKCS12
server.ssl.keyAlias: tomcat
Eureka Server is an application that holds the information about all client-service applications. Every Micro service will register into the Eureka server and Eureka server knows all the client applications running on each port and IP address. Eureka Server is also known as Discovery Server.
In this chapter, we will learn in detail about How to build a Eureka server.
Building a Eureka Server
Eureka Server comes with the bundle of Spring Cloud. For this, we need to develop the Eureka server and run it on the default port 8761.
Visit the Spring Initializer homepage https://start.spring.io/ and download the Spring Boot project with Eureka server dependency. It is shown in the screenshot below −

After downloading the project in main Spring Boot Application class file, we need to add @EnableEurekaServer annotation. The @EnableEurekaServer annotation is used to make your Spring Boot application acts as a Eureka Server.
The code for main Spring Boot application class file is as shown below −
package com.tutorialspoint.eurekaserver;

import org.springframework.boot.SpringApplication;
import org.springframework.boot.autoconfigure.SpringBootApplication;
import org.springframework.cloud.netflix.eureka.server.EnableEurekaServer;

@SpringBootApplication
@EnableEurekaServer
public class EurekaserverApplication {
   public static void main(String[] args) {
      SpringApplication.run(EurekaserverApplication.class, args);
   }
}
Make sure Spring cloud Eureka server dependency is added in your build configuration file.
The code for Maven user dependency is shown below −
<dependency>
<groupId>org.springframework.cloud</groupId>
   <artifactId>spring-cloud-starter-eureka-server</artifactId>
</dependency>
The code for Gradle user dependency is given below −
compile('org.springframework.cloud:spring-cloud-starter-eureka-server')
The complete build configuration file is given below −
Maven pom.xml
<?xml version = "1.0" encoding = "UTF-8"?>
<project xmlns = "http://maven.apache.org/POM/4.0.0"
   xmlns:xsi = "http://www.w3.org/2001/XMLSchema-instance"
   xsi:schemaLocation = "http://maven.apache.org/POM/4.0.0
   http://maven.apache.org/xsd/maven-4.0.0.xsd">

   <modelVersion>4.0.0</modelVersion>
   <groupId>com.quicklearn</groupId>
   <artifactId>eurekaserver</artifactId>
   <version>0.0.1-SNAPSHOT</version>
   <packaging>jar</packaging>
   <name>eurekaserver</name>
   <description>My DEMO project for Spring Boot</description>

   <parent>
      <groupId>org.springframework.boot</groupId>
      <artifactId>spring-boot-starter-parent</artifactId>
      <version>1.5.9.RELEASE</version>
      <relativePath/> <!-- lookup parent from repository -->
   </parent>

   <properties>
      <project.build.sourceEncoding>UTF-8</project.build.sourceEncoding>
      <project.reporting.outputEncoding>UTF-8</project.reporting.outputEncoding>
      <java.version>1.8</java.version>
      <spring-cloud.version>Edgware.RELEASE</spring-cloud.version>
   </properties>

   <dependencies>
      <dependency>
         <groupId>org.springframework.cloud</groupId>
         <artifactId>spring-cloud-starter-eureka-server</artifactId>
      </dependency>

      <dependency>
         <groupId>org.springframework.boot</groupId>
         <artifactId>spring-boot-starter-test</artifactId>
         <scope>test</scope>
      </dependency>
   </dependencies>

   <dependencyManagement>
      <dependencies>
         <dependency>
            <groupId>org.springframework.cloud</groupId>
            <artifactId>spring-cloud-dependencies</artifactId>
            <version>${spring-cloud.version}</version>
            <type>pom</type>
            <scope>import</scope>
         </dependency>
      </dependencies>
   </dependencyManagement>

   <build>
      <plugins>
         <plugin>
            <groupId>org.springframework.boot</groupId>
            <artifactId>spring-boot-maven-plugin</artifactId>
         </plugin>
      </plugins>
   </build>

</project>
By default, the Eureka Server registers itself into the discovery. You should add the below given configuration into your application.properties file or application.yml file.
application.properties file is given below −
eureka.client.registerWithEureka = false
eureka.client.fetchRegistry = false
server.port = 8761
The application.yml file is given below −
eureka:
   client:
      registerWithEureka: false
      fetchRegistry: false
server:
   port: 8761
Now, you can create an executable JAR file, and run the Spring Boot application by using the Maven or Gradle commands shown below −
For Maven, use the command as shown below −
mvn clean install
After “BUILD SUCCESS”, you can find the JAR file under the target directory.
For Gradle, you can use the command shown below −
gradle clean build
After “BUILD SUCCESSFUL”, you can find the JAR file under the build/libs directory.
Now, run the JAR file by using the following command −
java –jar <JARFILE>
You can find that the application has started on the Tomcat port 8761 as shown below −

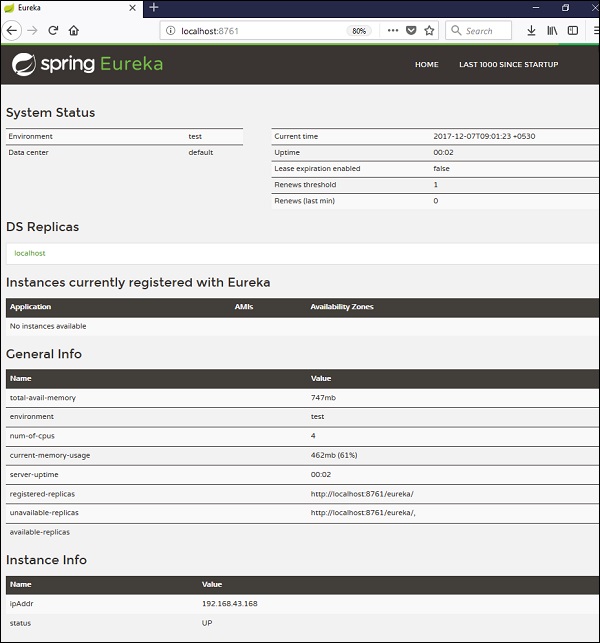
Now, hit the URL http://localhost:8761/ in your web browser and you can find the Eureka Server running on the port 8761 as shown below −
 Service Registration with Eureka
In this chapter, you are going to learn in detail about How to register the Spring Boot Micro service application into the Eureka Server. Before registering the application, please make sure Eureka Server is running on the port 8761 or first build the Eureka Server and run it. For further information on building the Eureka server, you can refer to the previous chapter.
First, you need to add the following dependencies in our build configuration file to register the microservice with the Eureka server.
Maven users can add the following dependencies into the pom.xml file −
<dependency>
   <groupId>org.springframework.cloud</groupId>
   <artifactId>spring-cloud-starter-eureka</artifactId>
</dependency>
Now, we need to add the @EnableEurekaClient annotation in the main Spring Boot application class file. The @EnableEurekaClient annotation makes your Spring Boot application act as a Eureka client.
The main Spring Boot application is as given below −
package com.quicklearn.eurekaclient;

import org.springframework.boot.SpringApplication;
import org.springframework.boot.autoconfigure.SpringBootApplication;
import org.springframework.cloud.netflix.eureka.EnableEurekaClient;

@SpringBootApplication
@EnableEurekaClient
public class EurekaclientApplication {
   public static void main(String[] args) {
      SpringApplication.run(EurekaclientApplication.class, args);
   }
}
To register the Spring Boot application into Eureka Server we need to add the following configuration in our application.properties file
The code for application.properties file is given below −
eureka.client.serviceUrl.defaultZone  = http://localhost:8761/eureka
eureka.client.instance.preferIpAddress = true
spring.application.name = eurekaclient
Now, add the Rest Endpoint to return String in the main Spring Boot application and the Spring Boot Starter web dependency in build configuration file. Observe the code given below −
package com.quicklearn.eurekaclient;

import org.springframework.boot.SpringApplication;
import org.springframework.boot.autoconfigure.SpringBootApplication;
import org.springframework.cloud.netflix.eureka.EnableEurekaClient;
import org.springframework.web.bind.annotation.RequestMapping;
import org.springframework.web.bind.annotation.RestController;

@SpringBootApplication
@EnableEurekaClient
@RestController
public class EurekaclientApplication {
   public static void main(String[] args) {
      SpringApplication.run(EurekaclientApplication.class, args);
   }
   @RequestMapping(value = "/")
   public String home() {
      return "Eureka Client application";
   }
}
Zuul Proxy Server and Routing:
Zuul Server is a gateway application that handles all the requests and does the dynamic routing of microservice applications. The Zuul Server is also known as Edge Server.
For Example, /api/user is mapped to the user service and /api/items is mapped to the item service and Zuul Server dynamically routes the requests to the respective backend application.
Add the @EnableZuulProxy annotation on your main Spring Boot application. The @EnableZuulProxy annotation is used to make your Spring Boot application act as a Zuul Proxy server.
package com.quicklearn.zuulserver;

import org.springframework.boot.SpringApplication;
import org.springframework.boot.autoconfigure.SpringBootApplication;
import org.springframework.cloud.netflix.zuul.EnableZuulProxy;

@SpringBootApplication
@EnableZuulProxy
public class ZuulserverApplication {
   public static void main(String[] args) {
      SpringApplication.run(ZuulserverApplication.class, args);
   }
}
You will have to add the Spring Cloud Starter Zuul dependency in our build configuration file.
Maven users will have to add the following dependency in your pom.xml file −
<dependency>
   <groupId>org.springframework.cloud</groupId>
   <artifactId>spring-cloud-starter-zuul</artifactId>
</dependency>
For Zuul routing, add the below properties in your application.properties file or application.yml file.
spring.application.name = zuulserver
zuul.routes.users.path = /api/demo/**
zuul.routes.users.url = http://localhost:8080/
server.port = 8111
Creating Spring Cloud Configuration Server
Spring Cloud Configuration Server is a centralized application that manages all the application related configuration properties. In this chapter, you will learn in detail about how to create Spring Cloud Configuration server.
Now, add the Spring Cloud Config server dependency in your build configuration file as explained below −
Maven users can add the below dependency into the pom.xml file.
<dependency>
   <groupId>org.springframework.cloud</groupId>
   <artifactId>spring-cloud-config-server</artifactId>
</dependency>
Now, add the @EnableConfigServer annotation in your main Spring Boot application class file. The @EnableConfigServer annotation makes your Spring Boot application act as a Configuration Server.
The main Spring Boot application class file is given below −
package com.quicklearn.configserver;

import org.springframework.boot.SpringApplication;
import org.springframework.boot.autoconfigure.SpringBootApplication;
import org.springframework.cloud.config.server.EnableConfigServer;

@SpringBootApplication
@EnableConfigServer
public class ConfigserverApplication {
   public static void main(String[] args) {
      SpringApplication.run(ConfigserverApplication.class, args);
   }
}
Now, add the below configuration to your properties file and replace the application.properties file into bootstrap.properties file. Observe the code given below −
server.port = 8888
spring.cloud.config.server.native.searchLocations=file:///C:/configprop/
SPRING_PROFILES_ACTIVE=native
Configuration Server runs on the Tomcat port 8888 and application configuration properties are loaded from native search locations.
Now, in file:///C:/configprop/, place your client application - application.properties file. For example, your client application name is config-client, then rename your application.properties file as config-client.properties and place the properties file on the path file:///C:/configprop/.
The code for config-client properties file is given below −
welcome.message = Welcome to Spring cloud config server
Enabling Spring Boot Actuator
Spring Boot Actuator provides secured endpoints for monitoring and managing your Spring Boot application. By default, all actuator endpoints are secured. In this chapter, you will learn in detail about how to enable Spring Boot actuator to your application.
To enable Spring Boot actuator endpoints to your Spring Boot application, we need to add the Spring Boot Starter actuator dependency in our build configuration file.
Maven users can add the below dependency in your pom.xml file.
<dependency>
   <groupId>org.springframework.boot</groupId>
   <artifactId>spring-boot-starter-actuator</artifactId>
</dependency>
In the application.properties file, we need to disable the security for actuator endpoints.
management.security.enabled = false
If you want to use the separate port number for accessing the Spring boot actutator endpoints add the management port number in application.properties file.
management.port = 9000
Some important Spring Boot Actuator endpoints are given below. You can enter them in your web browser and monitor your application behavior.
| ENDPOINTS | USAGE |
|---|---|
| /metrics | To view the application metrics such as memory used, memory free, threads, classes, system uptime etc. |
| /env | To view the list of Environment variables used in the application. |
| /beans | To view the Spring beans and its types, scopes and dependency. |
| /health | To view the application health |
| /info | To view the information about the Spring Boot application. |
| /trace | To view the list of Traces of your Rest endpoints. |


Comments
Post a Comment